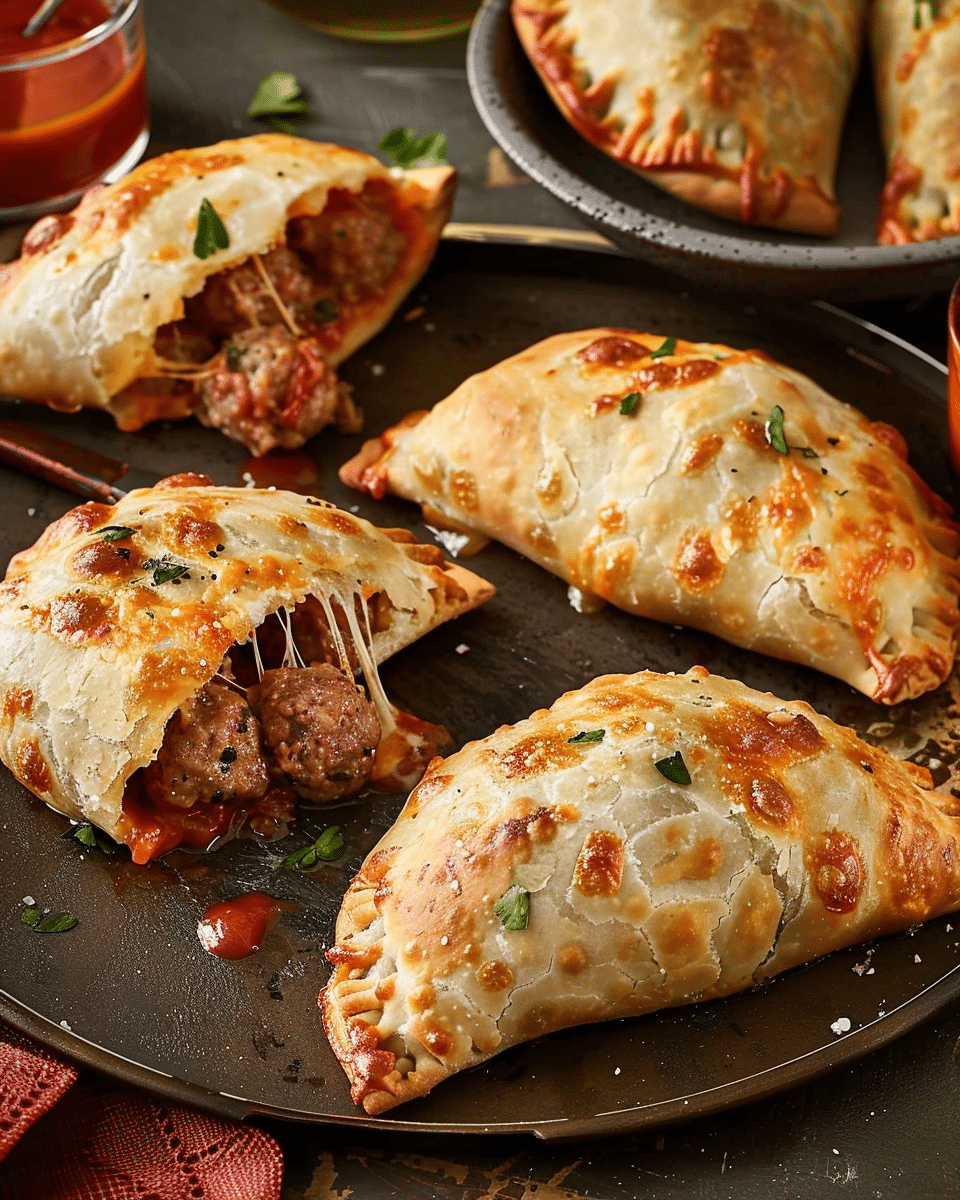
This recipe for Cheesy Meatball Pockets brings together tender beef meatballs, gooey melted cheese, and savory marinara, all wrapped in soft, golden biscuit dough. It’s a quick and comforting handheld meal that reminds me of a childhood favorite—but with a satisfying, grown-up twist.

Why I’ll Love This Recipe
I love how easy this recipe is to throw together, especially when I’m short on time. Using pre-cooked frozen meatballs and store-bought biscuit dough means I can have a warm, cheesy, satisfying meal on the table in just about 30 minutes. The melty cheese, flavorful meatballs, and golden-brown crust make it a hit every time. Plus, it’s customizable—I can switch up the sauce, cheese, or even the dough depending on what I have on hand.
Ingredients
(Here’s a tip: Check out the full list of ingredients and measurements in the recipe card below.)
-
1 pound frozen fully-cooked beef meatballs, thawed and thinly sliced
-
1 can (16.3 ounces) refrigerated biscuit dough
-
1 cup marinara sauce
-
1 cup diced tomatoes, drained
-
1½ cups shredded Italian blend cheese, divided
-
½ teaspoon Italian seasoning
-
Marinara or Alfredo sauce (optional, for serving)
Directions
-
I preheat the oven to 400°F.
-
On a lightly floured surface, I roll each biscuit into a 6-inch disc, about 1/8-inch thick.
-
I divide the sliced meatballs evenly among the dough discs, placing them in the center.
-
On top of each portion, I add 2 tablespoons of marinara sauce, diced tomatoes, and shredded cheese.
-
I fold the dough over the filling and press the edges with a fork to seal them. (A little water on the edges helps them stick better.)
-
I place the pockets on a greased, shallow-rimmed baking sheet and cut a few small slits on top to vent.
-
I sprinkle the tops with the remaining cheese and Italian seasoning.
-
I bake them for 10 to 12 minutes, or until golden brown and crispy.
-
I like to serve these with warm marinara or Alfredo sauce on the side for dipping.
Alternate Cooking Method
If I’m using a pizza oven, I preheat it to 500°F and bake the pockets for 3 to 5 minutes until puffed and browned on the bottom.
Servings and Timing
This recipe makes 8 servings, with each person getting one cheesy meatball pocket. From start to finish, it takes about 30 minutes—perfect for a quick weeknight dinner or a fun party appetizer.
Variations
-
Spicy Kick: I sometimes add red pepper flakes or use spicy marinara for an extra kick.
-
Cheese Swap: Mozzarella, provolone, or even pepper jack can be used instead of Italian blend cheese.
-
Different Dough: Crescent roll dough or pizza dough works just as well if I want a slightly different texture.
-
Veggie Boost: I mix in sautéed onions, bell peppers, or mushrooms for added flavor and texture.
-
Sauce Twist: Pesto or Alfredo instead of marinara gives these pockets a totally different vibe.
Storage/Reheating
To store leftovers, I let the pockets cool completely, then place them in an airtight container in the fridge for up to 3 days. For longer storage, I wrap them individually and freeze for up to 2 months.
When reheating, I pop them in the oven or toaster oven at 350°F for about 10 minutes if refrigerated, or 20 minutes if frozen, until warmed through. Microwaving is quick, but I prefer the oven to keep the crust crispy.
FAQs
What kind of meatballs should I use?
I use fully-cooked frozen beef meatballs for convenience, but any kind of fully-cooked meatballs (turkey, chicken, or even homemade) can work as long as they’re thawed and sliced thin.
Can I make these pockets ahead of time?
Yes, I assemble the pockets, store them in the fridge (uncooked) for up to 24 hours, then bake them when I’m ready. I don’t recommend storing them with sauce inside for longer than that to prevent soggy dough.
Can I air fry these instead of baking?
Absolutely. I preheat my air fryer to 370°F and cook the pockets for 8–10 minutes, checking for a golden brown crust and warm filling.
Are these good for kids?
They’re perfect for kids! The handheld size and cheesy, saucy filling make them fun and easy to eat. I sometimes leave out the diced tomatoes for picky eaters.
What should I serve with Cheesy Meatball Pockets?
I like to serve them with a side salad, steamed veggies, or just some extra marinara sauce for dipping. They also pair well with roasted potatoes or garlic bread if I want to make it a bigger meal.
Conclusion
Cheesy Meatball Pockets are one of those comforting, satisfying meals I can count on when I need something fast, fun, and flavorful. Whether I’m feeding my family or whipping up a snack for game night, these pockets always hit the spot. With just a few ingredients and less than 30 minutes, I can bring a warm, cheesy, nostalgic dish to the table that everyone loves.
Print
Cheesy Meatball Pockets
- Total Time: Approximately 2 days (including resting/chilling)
- Yield: About 15 croissants
- Diet: Vegetarian
Description
Classic buttery croissants with golden, flaky layers that melt in your mouth—made via the traditional laminated dough technique. It requires time and patience, but rewards with bakery-quality croissants right from your oven.
Ingredients
- 4 cups all‑purpose flour
- 1 cup warm whole milk
- ¼ cup granulated sugar
- 2¼ tsp instant yeast (1 packet)
- 1½ tsp salt
- 3 tbsp unsalted butter, softened (for the dough)
- 1 cup unsalted butter, cold (for lamination)
- 1 egg (for egg wash)
Instructions
- Prepare the dough: Mix flour, sugar, salt, yeast, warm milk, and softened butter until a smooth dough forms. Chill overnight (8–12 hours).
- Lamination: Flatten cold butter into a square. Roll dough into a larger square and enclose the butter inside. Perform a series of folds—typically letter and book folds—chilling between each to keep butter firm. This layering is key to flaky, airy croissants.
- Shape and proof: Roll out dough, cut into triangles, and roll each from wide end to tip. Let shaped croissants proof until puffy and jiggly.
- Finish and bake: Brush with beaten egg for a glossy crust. Bake at 375 °F (190 °C) for 22–25 minutes until deeply golden.
Notes
- Use European-style butter with high fat content (82%+) for better flavor and texture. :contentReference[oaicite:0]{index=0}
- Maintain precise temperature: butter should be pliable (~55 °F/13 °C), dough slightly colder (~40 °F/6 °C) for ideal lamination. :contentReference[oaicite:1]{index=1}
- Work in a cool environment (under 65 °F/18 °C) and chill between folds to prevent butter melting and ruining layers. :contentReference[oaicite:2]{index=2}
- Laminate only as much as needed—over-folding or overly warm dough can flatten croissants and ruin lift. :contentReference[oaicite:3]{index=3}
- Softened-butter lamination offers a more approachable method for home bakers. :contentReference[oaicite:4]{index=4}
- Prep Time: 45 minutes active (plus overnight rest)
- Cook Time: undefined
- Category: Pastry
- Method: Laminated Dough (Folding and Rolling)
- Cuisine: French Viennoiserie
Nutrition
- Serving Size: 1 croissant
- Calories: 250 (approximate)
- Sugar: 5g
- Sodium: 150mg
- Fat: 12g
- Saturated Fat: 7g
- Unsaturated Fat: 4g
- Trans Fat: 0g
- Carbohydrates: 28g
- Fiber: 1g
- Protein: 5g
- Cholesterol: 30mg


